|
** Preparing the Pieces and Sewing
the Block **
I suggest for this one, since there are once again
many pieces, that you print off several copies of the templates. Darken the outlines for
each piece you will need ...cut out ...add the 1/4" seam allowances. Refer to the
templates to see which pieces are underneath other pieces. Make one extra set of four
templates and tape them together along the red quadrant lines. Use this as a placement
guide. I didn't list it as a needed color, but you will also need an 16 1/2-17" square
of white background fabric! You'll also need some black floss to embroider the music
lines, notes and clef, and floss to match the lyre base.
If you want a sneak preview of what the whole
block will look like, CLICK HERE. Do NOT
try to print out this one though, it is WAY too Large an image to print, and hence
may take a while to load, also!
Follow the directions below for order of placement
:o) |
|
 |
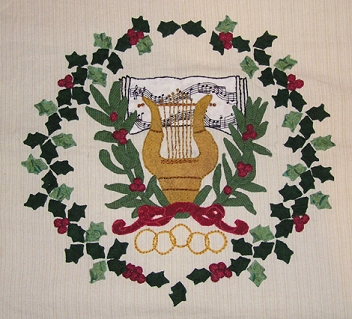
Find the center of the background square and mark
lightly. If you prefer, you can lightly draw the basic placement of your pieces onto the
background. You may lay the cut pieces on the background to see if you are satisfied with
the layout, and then remove all but the music book and rings. Applique these in place
using thread to match the pieces being appliquťd on. Note that the center ring goes down
first, and then the next two out from it, and then the last two out. Embroider lines
notes, etc, on the book using backstitch and black floss. |
|
 |
Checking your master template for
placement. lay on the cross bar and pin in place. Applique down with thread to match the
crossbar. Next pin on and appliquť the two lyre "horns". Now pin on and
appliquť the lyre base. Using floss to match it, embroider lines to indicate it's sections, in
backstitch. If you prefer, you can machine stitch on those lines! |
|
 |
Now pin on and appliquť the lyre body. Pin on and
appliquť the thin lyre "strings". |
|
 |
Then pin on and appliquť the mistletoe leaves stems
and berries, using thread to match... |
|
 |
Now pin on and appliquť the bow... |
|
 Oct 18 2000Marcia
Hohn Oct 18 2000Marcia
Hohn |

|
|
|

