|
Applique Rose - Page 2 |
|
|
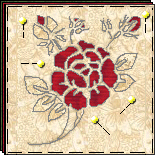
Next, layer your Color 3, Color 2 and Color 1 10-1/2" squares, all right side UP. Baste around the outer edges, and pin in a few places near the working area... |
|
|
Now, following those directions for cutting away the working area on the Applique Page, cut away the large areas that will be the red rose, through the top layer of Color 1 fabric only, and being sure to leave a 1/8" - 3/16" seam allowance to turn under. Appliqué these down, using a thread to match the top square. You may cut out one area at a time, or all at once....I would do one at a time :o) |
|
|
When you red areas are all done, cut away through both the Color 1 and Color 2 layers to reveal the large green areas. again, leave a 1/8" to 3/16" seam allowance to turn under. Applique these down, using a thread to match the top square. At this point, your stems and very narrow green areas are not done... |
|
|
You have choices! Those of you who are comfortable with reverse applique should now cut just a single line through both top layers where the narrow stems will be, and turn these under with the smallest hems you can muster, revealing thin green stems. For the less brave, or if you are in a hurry...embroider these areas using three strands of green floss that closely matches the green of your leaves! |
 |
|
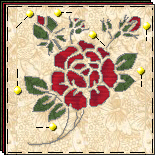
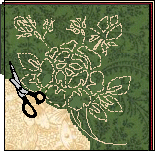
Next, flip over the whole block. The tan stitching here represents your stitching, which you have done through all layers. Using small sharp scissors, you may cut away the red and green layers of fabric around the design area to reduce bulk. You may omit this step, if you won't be doing quilting, or if you want to try quilting through all three layers! |
|
|
|
|
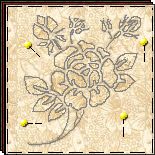
Original Block |
pattern from http://www.quilterscache.com |