|
Pinkham Notch - Page 2 |
|
|
Next sew together two Color 1 2-1/2" x 10" strips and one Color 3 10" x 6-1/2" strip using 1/4" seams to make the unit shown far left. Press seams to darker sides. Cut this into four sub-unit D's at 2-1/2" intervals. |

|
|
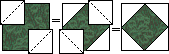
Place a Color 3 3-1/2" square right sides together atop opposing corners of the Color 1 6-1/2" square, with all edges aligned. ( I show them staggered here just so you can see that there are two layers) On the back of the top squares, lightly draw the diagonals then sew ON the drawn lines. Cut off the excess seam allowance, and press the remainder towards the outer triangle. Repeat this with two more Color 3 squares on the opposing corners. Make two units like this... |
|
|
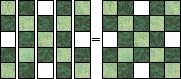
In this order sew together the sub-unit strips we made--A-B-C-B-A, pressing seams in one direction. Make two units like this... |
|
|
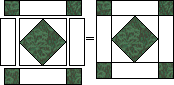
Now sew Color 3 rectangles to the left and right of a Square-in-Square unit. Press seams towards center. Add sub-unit D's to the top and bottom. Make two units like this... |
|
|
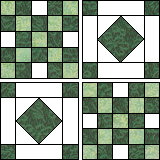
Layout the blocks quadrants as shown at left. Sew together into two horizontal rows. Join the rows and your block is done! Good Job!! |
|
|
|
||
|
Original Block |
http://www.quilterscache.com |