|
|
|
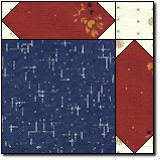
A 1914 block-that-isn't-a-block!...so this is another of those "Method" instructionals, as opposed to a real "Block pattern" This design is named for it's SASHING, which forms the stars! Please abide by the Terms and Conditions of use! |
|
In the case of this pattern, it is the sashings that make the pattern. I will explain the construction of the pieces, as well as how a quilt is put together. |
|
** Preparing the Pieces and Sewing the Units ** The instructions below will give you a units worth, shown above, that is a finished 12" |
|
|
Start by cutting single fabric squares any desirable size that in its finished size is equally divisible by three, for example, a 9" square then add 1/2" for seam allowances = 9-1/2"... |
|
|
Then cut sashing rectangles, the same length as the square you just cut, and 1/3rd the width, plus 1/2" for seam allowances, for example, a 3-1/2" x 9-1/2" rectangle... |
|
|
For each sashing rectangle, cut four small background squares, each half the finished width of your sashing rectangle, plus 1/2" for seam allowances, for example, four 2" squares. Also cut one background square, the same width that you cut your sashing rectangles, for example, a 3-1/2" square... |
|
|
To make the sashing units, place a small background square right sides together with, and edges aligned with, one end of the sashing rectangle.(* Note that I show them staggered here, but that is just so that you can see I am layering two pieces of fabric... yours need to be aligned with the edges of the rectangle) ... |
|
Draw a light diagonal line on the back of the small square, and sew ON this drawn line. Cut off the excess seam allowance, leaving 1/4", and pressing that seam allowances towards the rectangle. Repeat this with another square on the opposing corner, and then with two more squares on the remaining two corners. This makes one sashing unit! ...on to Page 2! |
|
|
|
|
Traditional Quilt |
http://www.quilterscache.com |
|


