|

|
Kids Can Quilt!! |
|
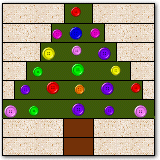
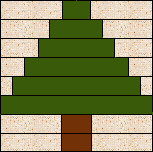
Here's an easy Christmas Tree Pattern! For
this pattern, pieces are joined to make rows, and then the rows are joined to make the
block. Your tree can then be decorated with Buttons, charms, etc. This
makes an 8" high by 11" block! |
|
This would make a fine small
wall hanging,
after adding a strip border, or perhaps a pillow top....and an excellent Christmas present
for your family!! {*Kris? Kate? are
you getting this?} |
|
*********************************************** |
|
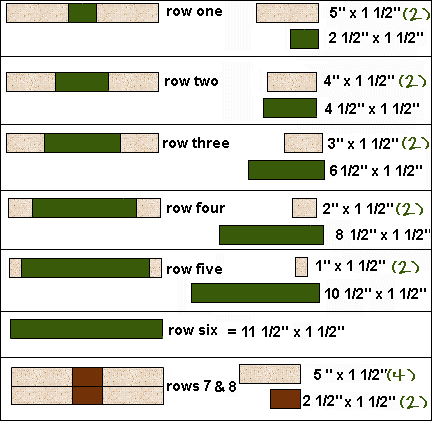
1.Cut your strips according to the
following: |
|
2.Lay out your cut pieces by rows, or
put one rows pieces in a baggie, to keep the right pieces together! |
|
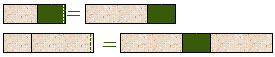
3.Begin sewing with ROW 1. [ and then ALL the rows are sewed the same
way!] First you sew a "tree" piece to one end of a background piece--with your
fabric lined up, and the right sides of the fabric together. Sew using a 1/4 inch seam.
Then you add the other background strip to the opposite side of the "tree"
piece. Iron your seams towards the "tree" fabric. See diagram below.. |
|
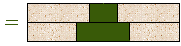
4. When all your rows have been sewn,
sew them to each other. Start by laying row two over row one, right sides of fabric
together and edges even. Sew together along the bottom edge, using a 1/4 inch seam. See
diagram below.. |
|

|
|
then add all the other rows in the same
way! |
|
 |
Next, add "decorations to your
tree....buttons...charms etc!...and you are all done!! Good Job!!! |
|
A note to parents or
teachers. For very young quilters it really does help to do the strip cutting FOR them, and
place each rows' pieces in individual baggies, labeled "row one" row two"
etc. |
|
 Sept 1999 Marcia Hohn Sept 1999 Marcia Hohn |
|